Known for their vibrant, tropical blooms and bold, architectural foliage, canna lilies are a fantastic addition to any garden. Whether you’re an experienced gardener or just getting started, canna planting offers an easy way to add height and color to your landscape. In this guide, we’ll cover how to plant canna bulbs and provide canna lily plant care tips to ensure they thrive in your garden. Plus, we’ll show you how using an auger can make the canna lily bulb planting process quicker and easier.
Why Choose Canna Lilies?
Canna lilies are prized for their bright flowers and large, striking leaves, making them ideal for adding a lush, tropical feel to any garden. Canna lilies are resilient once established, tolerate a variety of soil types, and attract pollinators like hummingbirds and butterflies. Additionally, they grow quickly and produce beautiful blooms throughout the summer, so it's easy for gardeners to make a bold statement with canna lily. How to plant them and care for them properly is essential. With the right approach, these plants will thrive and bring vibrant color to your garden.
When to Plant Canna Bulbs
The ideal canna bulb planting time is in the spring after the last frost has passed and when soil temperatures have warmed to at least 60°F (15°C). Depending on your location, this usually falls between late April and June.
Follow these 5 simple steps for canna planting and caring for canna lilies to enjoy vibrant blooms all summer long!
Step 1: Choose the Right Location
Since canna lilies thrive in full sun and prefer at least 6-8 hours of direct sunlight each day, the best place to plant canna lilies is a sunny spot in your garden where the soil drains well. Although cannas are fairly adaptable, they grow best in soil that is rich in organic matter, so consider mixing compost into your planting area to provide the nutrients they need.
Step 2: Decide How Far Apart to Plant Canna Bulbs
A common question when planting cannas is how far apart to plant canna bulbs. For optimal growth, space the bulbs (rhizomes) about 12-18 inches apart. This spacing provides the plants with enough room to spread without overcrowding, which promotes healthier growth and leads to more abundant blooms.
Step 3: Prepare the Soil and Use an Auger for Planting
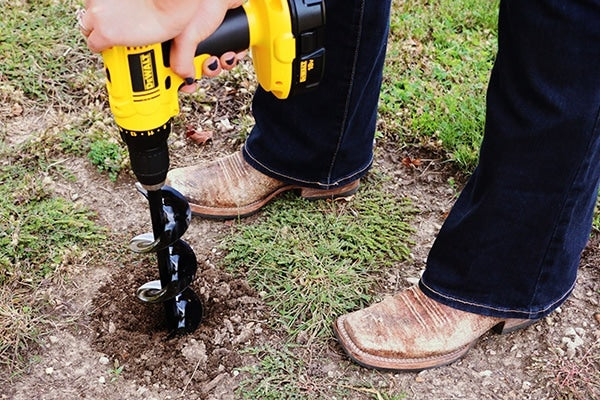
Before canna lily bulb planting, it’s important to prepare the soil by loosening it to a depth of 8-12 inches. This allows the rhizomes to establish themselves quickly. If you want to make this step faster and easier, using a garden auger can be a real time-saver. With a tool like the Power Planter Extended Length Bulb Auger, you can quickly drill uniform planting holes in seconds, saving time and reducing the strain of manual digging.
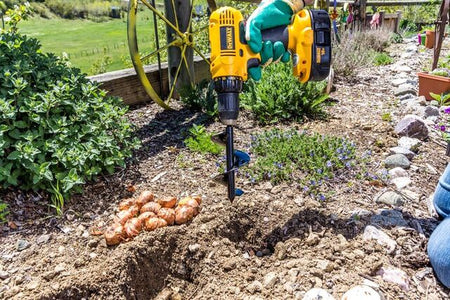
Attach the auger to a standard drill, we recommend DeWalt brand drills; position it where you want to plant and drill holes to a depth of 4-5 inches. Using an auger makes it easy to create consistent holes, especially if you're planting multiple bulbs. Once your holes are drilled, add a bit of compost or organic matter to each hole before planting.
Pro Tip: If you’re working in heavy clay or compacted soil, the auger will also help aerate the soil as it drills, ensuring good drainage, which is essential for canna bulbs.
Once your holes are drilled (either manually or with an earth auger), place each rhizome horizontally in the hole, with the eyes (small shoots) facing upwards. Next, cover the bulbs with 2-3 inches of soil, then gently firm the soil down. Finally, you should water the newly planted cannas thoroughly after planting. This will help settle the soil around the bulbs and give the rhizomes a good start.
If you use an auger to dig the holes, you’ll have all the holes prepped quickly, making it much easier to plant a large number of bulbs at once. This is especially helpful if you’re planning a big display or planting cannas in multiple areas.
Step 4: Canna Lily Plant Care
Once these canna planting steps one through three are complete, your new additions will need regular care to keep them looking their best throughout the growing season:
- Watering: Canna lilies prefer consistently moist soil, especially during the growing season. Water deeply once or twice a week, ensuring the soil stays damp but not waterlogged. Adding mulch around the plants can help retain moisture and regulate soil temperature.
- Fertilizing: For the healthiest plants and most vibrant blooms, fertilize your cannas every 4-6 weeks with a balanced fertilizer. This provides the necessary nutrients to support robust growth.
- Deadheading: Once flowers begin to fade, remove them to encourage new blooms. Cannas are prolific bloomers, and deadheading will help extend their flowering season well into late summer and early fall.
Step 5: Overwintering Canna Bulbs
In colder climates (USDA zones 6 and below), canna lilies will need to be dug up and stored over winter. After the first frost, cut the foliage down to about 6 inches, then carefully lift the rhizomes from the ground. Allow the rhizomes to dry for a few days before storing them in peat moss or a paper bag in a cool, dry place. Come spring, you can replant them for another season of spectacular blooms.
As summer fades and your outdoor garden winds down, you can still enjoy beautiful blooms indoors with waxed amaryllis bulbs. These unique, free-standing bulbs require no soil or water, making them a low-maintenance way to enjoy bright, cheerful flowers during the winter months.
Canna lilies are a show-stopping addition to any garden, offering vibrant color and lush foliage throughout the summer months. By knowing how to plant canna bulbs properly and the best practices for canna lily plant care, you’ll enjoy a season of spectacular blooms. With the help of a garden auger, you can make the planting process faster, easier, and more efficient.


